E15 error code
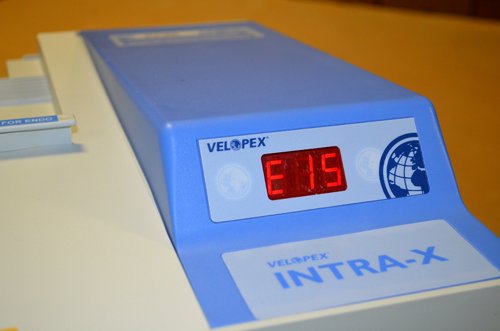
An E15 error on your processor's display indicates the dryer temperature was too high. This is usually caused by one of two things.
If the processor was working for a while before the E15 error appeared, the problem is most probably associated with a dirty dryer heating element.
If the E15 error appeared just after the processor finished the initiation cycle and while the processor was in tLo then the problem is associated with a faulty Triac on the AC Power Circuit Board.
There is a simple way in determining what caused the error without using any test equipment. Keep in mind, it's always a good idea to clean the dryer heating element when an E15 error appears, no matter what caused the error.
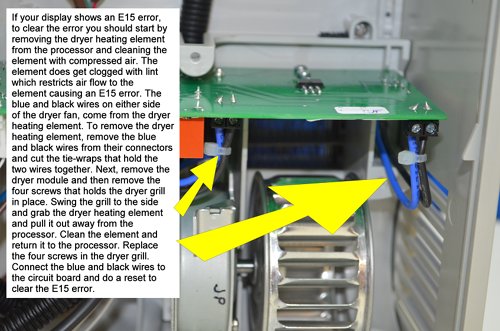
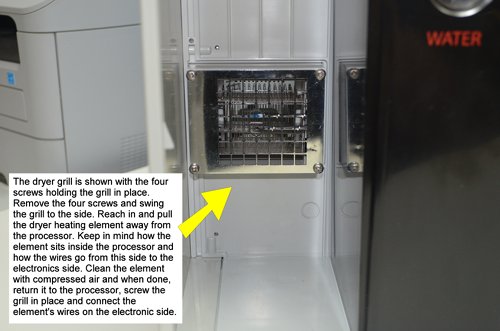
To clean the dryer heating element correctly, if must be removed from the processor. We will be addressing the MK6 processor's cleaning procedures. The MK5 is basically the same. The only difference is where the electronics sit in an MK5. Refer to the photos below to help you identify and locate components mentioned below.
Cleaning the dryer heating element ...
Start by removing the phillips screw located just above the AC plug in the back of the processor. Lift the blue lid and carefully lay it on the white lid, out of the way. There are wires attached to the bottom of the blue lid so don't pull it up too fast when removing the lid. Remove the side panel on the electronic's side next. If you don't know how to remove the side panel I suggest you watch the short video on our website that shows how to remove a side panel.
Click HERE to watch the video.
Once the side panel is removed locate the plastic shroud that covers the dryer fan. Remove the gray piece of plastic that sits on top the shroud. One screw and some Velcro hold it in place. Next remove the four screws that hold the shroud in place. One screw is located on the bottom left of the shroud, one screw is located on the top of the shroud and the final two screws are located on the right side of the shroud. Remove the shroud.
The circuit board that sits upside down above the dryer fan is the AC Power Circuit Board. You will see two sets of black and blue wires in the middle and right side of the circuit board. Remove these wires from their connectors. You will need to cut the tiewraps that goes around the wires. Replace the blue lid back in place. Don't screw it in place at this time.
Now go to the other side of the processor. Remove the white lid that covers the tanks and modules. Remove the dryer module and the side panel. Look in the area the dryer module sat. You will see the dryer grill. Remove the four small screws that hold the dryer grill in place. The grill has sensors attached to it so be careful and don't pull the grill away damaging the sensors. Simply, swing the grill to the side and let it hang. Note, how the dryer heating element sits in the processor and how the wires are routed through to the other side so you can easily replace the element after cleaning.
Remove the dryer heating element and take compressed air and blow away any dust, lint or dirt found in the element. After inspecting the element and seeing it is clean replace the dryer heating element back into the processor.
Now assuming an E15 error was on the display before we cleaned the dryer heating element, we need to do a reset to remove the error before the processor will run again. Reset instructions can be found on our website or you can get the MK6 reset instructions or MK5 reset instructions here.
After resetting the processor, run through a few cycles to ensure the processor does not get another E15 error. If all is good you are finished. If the E15 error returns after the initiation cycle completes, continue on by checking the Triac on the AC Power Circuit Board.
To check the Triac on the AC Power Circuit Board ...
If your processor has an E15 error on the display, start by resetting the error. Here are the MK6 reset instructions and the MK5 reset instructions. After resetting the processor turn it off to keep from getting another error should the Triac prove bad.
With the processor powered off remove the white lid that covers the tanks and modules. Remove the dryer module and then remove the side panel. Replace the white lid back onto the processor. What we have done is, with the dryer module and side panel removed we now have a way to stick our hand into the processor right up to the dryer grill assembly when the processor is running.
Power the processor back on. You are now in the initiation cycle. The dryer heater will give off some warm heat, about 90 degrees worth. Watch the display countdown. When the display gets to around 15 put your hand into the area once occupied by the dryer module. Put your hand near the dryer grill. When the initiation cycle finishes you will see on the display three dashes going from the top left side of the display down to the lower right side of the display in a diagonal formation. This is the cool down cycle and it lasts about twenty seconds. You should feel cool air coming from the dryer grill at this time. Keep your hand in place. When the cool down cycle ends the fan motor will kick way down and push very little air through the dryer grill. You should see tLo on the display. This indicates the chemicals in the developer and fixer tanks are heating up. The processor will not run at this time. You should also feel cool air at this time coming from the dryer grill. This is how the dryer should act normally. If you feel hot air coming from the dryer grill, that seems to be getting hotter by the second, turn the processor off. If you don't turn it off fast enough another E15 error will appear on the display again, requiring another reset.
The hot heat coming from the dryer grill during tLo indicates a Triac on the AC Power Circuit Board is shorted and not turning the dryer heater off when in tLo or standby. With it shorted and barely no cool air blowing across the dryer heating element, the element produces a high level of heat, enough to cause the E15 error.
If this is the case you will need to order a new electronics kit to repair your processor.


