E14 error code
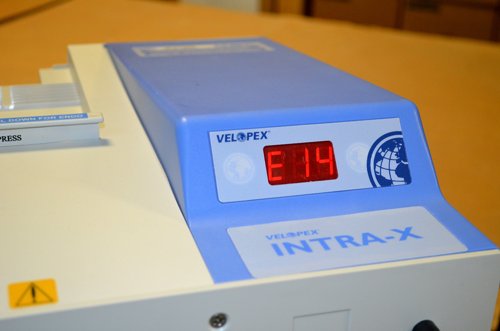
An E14 error on your processor's display indicates the developer or fixer chemical temperatures are too high.
The first thing you want to do is check the developer and fixer chemical temperatures, especially if the processor has been on for a while. This will give us a good indication as to where we are temperature wise and it will tell us if we actually have a heating problem or not.
If the processor has been off for a while or maybe the error happened yesterday and you are checking the processor the next day, when the chemicals have cooled down to room temperature, this wouldn't give us a good indication as to whether the chemicals actually were too hot. In a case such as this, it would be a good thing to reset your processor to eliminate the E14 error and then process film again normally until the error returns, if it does. Then you could measure the developer and fixer chemical temperatures at that time to get a good understanding if we have a heating problem or not.
Reset instructions can be found on our website or you can get the MK6 reset instructions or MK5 reset instructions here.
If you find the a chemical temperature is too hot you can do a little testing to see if you have a bad sensor or not. Rarely, will you find both the developer and fixer chemical temperatures getting too hot at the same time and that's a good thing.
Let's start by getting into your processor. Power the processor off and then remove the phillips screw located just above the AC plug in the back of the processor. Lift the blue lid and carefully lay it on the white lid, out of the way. There are wires attached to the bottom of the blue lid so don't pull it up too fast when removing the lid. To make it easier for you, remove the side panel next. If you don't know how to remove the side panel I suggest you watch the short video on our website that shows how to remove a side panel.
Click HERE to watch the video.
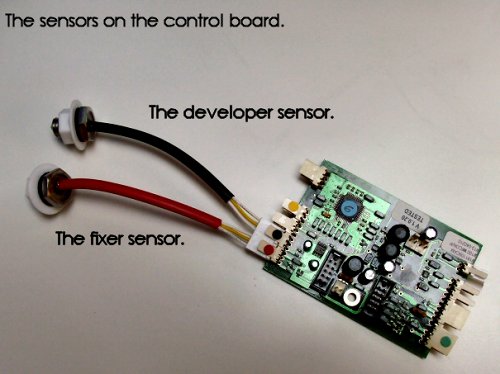
Once the side panel is removed locate the developer chemical sensor's Molex connector connected to the control board. The developer chemical sensor connector is the second connector from the top left. It has two white wires going into the Molex connector and a black sleeve covering the white wires. Remove the Molex connector and grab your multimeter.
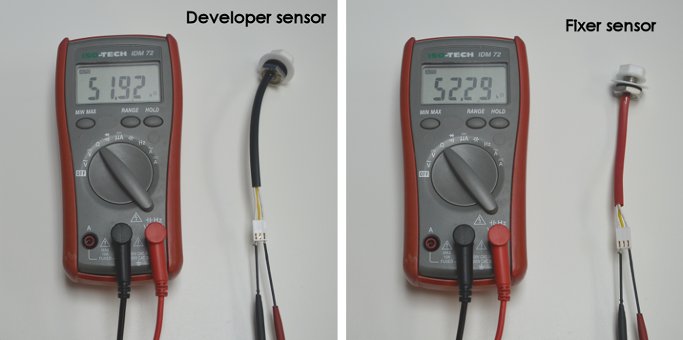
Select the OHMS setting on your meter. A typically good sensor will indicate between 48k ohms and 54k ohms. An open sensor will indicate 0.L on your meter's display.
When checking the sensor it is a good idea to check it when the sensor is at room temperature and has been at room temperature for a few minutes to ensure the sensor is stable.
Refer to the pictures below as to where the meter leads should be connected to the sensors.
You can check the developer chemical sensors in the MK5 and MK6 Intra and Xtender processors the same way. The sensors may appear a little different in looks, but they all work the same and have the same resistance. Keep in mind, the Xtender sensors will have a third wire, which is yellow. It sits between the two white wires. Do not worry about this wire when measuring the resistance of the sensor. Always measure between the two white wires.
Next, locate the fixer chemical sensor's Molex connector connected to the control board. The fixer chemical sensor connector is the first connector from the top left. It has two white wires going into the Molex connector and a red sleeve covering the white wires. Remove the Molex connector and measure the resistance just like you did for the developer chemical sensor.
If your resistance readings are out of tolerance you'll need to order new chemical temperature sensors. It is always a good idea to order both sensors at the same time, even if only one shows bad.
If the sensors check good then run your processor normally and monitor the chemical temperatures periodically. If the chemicals are going to get too hot, it will happen within 15 to 20 minutes. If the developer or fixer chemicals get too hot and the sensors did check good your Control Board is not talking to the sensors correctly. In this case, you'll need to order an Electronics Kit.
When a processor has an E14 error and the Electronics Kit needs to be replaced it is also a good idea to replace the developer and fixer chemical temperature sensors at the same time to ensure of getting rid of the E14 error. The sensors are not linear and may check well at room temperature, but change drastically when the chemicals heat up and quickly get out of tolerance causing an E14 error.


